
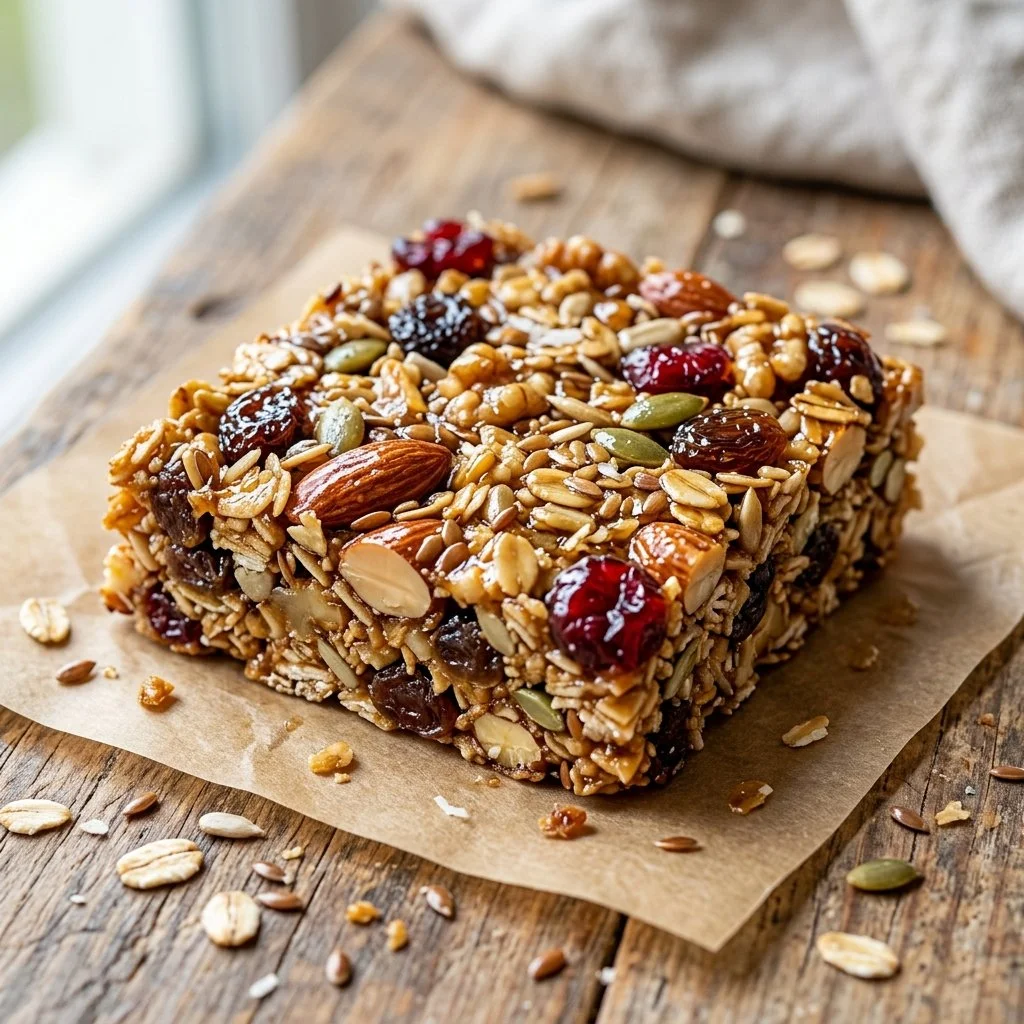
It was one of those mornings where the sun peeked through the kitchen window, casting a warm glow over the countertop. I was juggling too many tasks—packing lunch, prepping breakfast, and attempting to untangle a stubborn hair tie—when it struck me: I had absolutely nothing for the boys to munch on during their mid-morning slump. Granola bars! They’re not just a tasty snack; they’re the fuel that keeps us marching through our busy days. So, I decided to whip up a batch of homemade granola bars to save the day. And the best part? It’s a recipe that allows for endless creativity.
Recipe Timing
- Prep Duration: 10 minutes
- Active Cooking: 20 minutes
- Total Duration: 30 minutes
- Portion Size: About 12 bars
- Complexity: Simple
Nutritional Recipe
- Calories per portion: Approximately 180
- Protein: 5 grams
- Carbs: 22 grams
- Fats: 8 grams
- Fiber: 3 grams
- Sugars: 5 grams
- Sodium: 50 mg
Why You’ll Love This Homemade Granola Bars
There’s something magical about homemade snacks. They’re fresh, wholesome, and you can customize them to your heart’s content! These granola bars are no exception—crunchy, chewy, and studded with your favorite nuts and dried fruits. Perfect for breakfast on-the-go, a midday pick-me-up, or even a post-workout treat. With just a handful of simple ingredients, you’ll have a delicious snack ready in no time. Plus, they’re a great alternative to store-bought options that can be packed with hidden sugars and additives.
The Complete Cooking Journey
Making these granola bars is as satisfying as eating them! It starts with gathering your ingredients, which honestly is half the fun. You get to pick and choose which nuts or dried fruits to include, and I love how you can tailor them to suit your family’s taste buds. Once the mixture is combined, you’ll press it into a baking dish, popping it into the oven, where it transforms into a golden, fragrant treat. The delightful aroma wafts through your home, creating the ultimate ambience while you wait.
Ingredients:
- 2 cups rolled oats
- 1 cup nut butter (e.g., almond or peanut)
- 1/2 cup honey or maple syrup
- 1/2 cup nuts or seeds (e.g., almonds, walnuts, sunflower seeds)
- 1/2 cup dried fruit (e.g., raisins, cranberries, or chopped dates)
- 1/2 teaspoon vanilla extract
- 1/4 teaspoon salt
Method:
### Step 1: Preheat the Oven and Prepare the Dish
Preheat the oven to 350°F (175°C) and line a baking dish with parchment paper. This will ensure that your granola bars come out easily after baking.
### Step 2: Combine the Ingredients
In a large mixing bowl, combine the rolled oats, nut butter, honey or maple syrup, chosen nuts or seeds, dried fruit, vanilla extract, and salt. The nut butter acts as the glue bringing everything together and the honey or syrup adds just the right amount of sweetness.
### Step 3: Mix It All Together
Mix until all ingredients are well combined. You want everything to be evenly distributed, so each bar is packed with flavor.
### Step 4: Press the Mixture into the Dish
Press the mixture firmly into the prepared baking dish. This step is vital—firmly pressing down helps the bars hold together after baking.
### Step 5: Bake to Golden Perfection
Bake for 15-20 minutes until the edges are golden. Keep an eye on them, as you want that lovely golden color without over-baking.
### Step 6: Cool and Cut into Bars
Allow to cool completely before cutting into bars. This waiting period will help them solidify, making them easier to slice.
Serving Suggestions & Pairings
These homemade granola bars are delicious on their own, but you can also elevate your snacking experience. Pair them with a dollop of yogurt, a piece of fruit, or a hot cup of your favorite tea. They make a perfect addition to lunchboxes or a delightful post-workout snack.
Storage & Leftovers Guide
Store any leftover granola bars in an airtight container at room temperature for up to one week. If you want them to last longer, consider refrigerating them, where they will stay fresh for up to two weeks. You can even freeze them for a quick grab-and-go option later on!
Kitchen Wisdom & Success Tips
- Don’t skip the pressing step. Pressing the mixture firmly ensures your bars hold together nicely.
- Experiment with flavors! Feel free to swap out nuts or fruits based on what you have on hand. Coconut flakes, chocolate chips, or spices like cinnamon can add exciting dimensions.
- Use a greased spatula or your fingers to press down the mixture; it helps it stick together while you ensure an even surface.
Flavor Variations & Adaptations
Try adding a pinch of cinnamon for a cozy flavor boost, or switch out honey for agave syrup for a vegan-friendly alternative. Experiment with different nut butters like sunflower seed or cashew for unique twists. You can even turn these bars into a breakfast treat by adding some chia seeds or flaxseed!
Reader Questions & Solutions
-
Can I make these granola bars nut-free?
Yes! Substitute nut butter with sunbutter or soy nut butter, and choose nut-free seeds like pumpkin or sunflower. -
What can I use if I’m out of honey or maple syrup?
Barley malt syrup or brown rice syrup works well too! -
How do I know when the bars are done baking?
Look for a golden color on the edges. They will also feel firm to the touch. -
Can I add protein powder to the mixture?
Absolutely! Just ensure you balance it with a bit more nut butter or liquid so the bars don’t become too dry. -
What if my bars crumble when cutting?
If this happens, they may need to be pressed more firmly before baking, or simply make them into granola instead!
Wrapping Up
So there you have it—a simple, nutty, and sweet escape from the hustle and bustle of daily life! These homemade granola bars are not only easy to make but also a canvas for your creativity. So gather your ingredients, turn on that oven, and fill your home with the scent of baking goodness. You may just find that these bars become a cherished staple in your kitchen. Now go on, enjoy every scrumptious bite! 🍫💚
PrintHomemade Granola Bars
Easy and customizable homemade granola bars that are perfect for snacks, breakfast on-the-go, or post-workout treats.
- Prep Time: 10 minutes
- Cook Time: 20 minutes
- Total Time: 30 minutes
- Yield: 12 bars 1x
- Category: Snack
- Method: Baking
- Cuisine: American
- Diet: Vegetarian
Ingredients
- 2 cups rolled oats
- 1 cup nut butter (e.g., almond or peanut)
- 1/2 cup honey or maple syrup
- 1/2 cup nuts or seeds (e.g., almonds, walnuts, sunflower seeds)
- 1/2 cup dried fruit (e.g., raisins, cranberries, or chopped dates)
- 1/2 teaspoon vanilla extract
- 1/4 teaspoon salt
Instructions
- Preheat the oven to 350°F (175°C) and line a baking dish with parchment paper.
- Combine the rolled oats, nut butter, honey or maple syrup, chosen nuts or seeds, dried fruit, vanilla extract, and salt in a large mixing bowl.
- Mix until all ingredients are well combined.
- Press the mixture firmly into the prepared baking dish.
- Bake for 15-20 minutes until the edges are golden.
- Cool completely before cutting into bars.
Notes
Store leftover granola bars in an airtight container at room temperature for up to one week. Consider refrigerating or freezing for extended freshness.
Nutrition
- Serving Size: 1 bar
- Calories: 180
- Sugar: 5g
- Sodium: 50mg
- Fat: 8g
- Saturated Fat: 2g
- Unsaturated Fat: 6g
- Trans Fat: 0g
- Carbohydrates: 22g
- Fiber: 3g
- Protein: 5g
- Cholesterol: 0mg